Copilot Studio on pay-as-you-go, step by step
May 19 2026 · 12 min read · #copilot-studio #power-platform #licensing #teams
By Aaron Foong, AI & Data Solutions Engineer at AGOS Asia
Building your first agent in Copilot Studio takes an afternoon. Getting your organization set up so that agent can be built, paid for, and shipped to Teams takes a lot longer, and almost none of it happens inside Copilot Studio.
That gap is where projects stall. A developer builds a working agent, hits Publish, and nothing happens. Finance wants to know who’s paying for this. A colleague opens Copilot Studio and can’t see the environment. Each of these has a five-minute fix, but only if you know where to look.
This is the full walkthrough from an empty tenant to an agent sitting in the Teams app store. 8 steps, then a troubleshooting section for when one of them doesn’t go to plan.
What pay-as-you-go actually is
Pay-as-you-go bills your agent usage to an Azure subscription at the end of each month. There’s nothing to buy upfront and no commitment. Agents consume Copilot Credits as they work, and the charge shows up on your Azure bill.
The part that confuses almost everyone:
PAYG is not a per-user license. There’s no seat to assign to anybody. It’s a billing link between a Power Platform environment and an Azure subscription, set up once by an admin, and it covers everyone building agents in that environment.
If you’ve worked with Power Apps or Power BI, you’ve been trained to think of licensing as a per-person purchase. PAYG doesn’t work like that. Nobody needs to buy a Copilot Studio license or a Microsoft 365 Copilot license to build and publish agents once the billing plan exists. When someone can’t get in, it’s a permissions problem, and that has a different fix.
Credit consumption varies a lot by what the agent does. A classic answer from a topic costs a fraction of a generative answer over your SharePoint knowledge, and autonomous actions cost more again. Run Microsoft’s agent usage estimator before you commit to a volume, because a simple FAQ bot and a multi-agent workflow can be a factor of ten apart on the bill.
Before you begin
Gather these first. Missing any one of them will stop you partway through:
- An Azure subscription in your tenant, with owner or contributor rights for whoever is doing the setup.
- Admin rights in the Power Platform admin center. Environment admin is enough for environments you own. Power Platform admin or global admin covers everything in the tenant.
- A production or sandbox environment. PAYG doesn’t attach to trial environments.
- A Teams admin on standby. You’ll need them at step 8, and they usually aren’t you.
Time to allow: about an hour of actual clicking, spread across a week or two of waiting on other people.
Step 1: Get an Azure subscription, usually through your Microsoft partner
Most organisations don’t buy Azure directly from Microsoft. There’s already a licensing partner or reseller handling Microsoft 365 and everything else, and the Azure subscription should come through the same channel.
Do this: email your licensing partner and ask for an Azure subscription provisioned into your existing tenant, with owner or contributor rights granted to whoever will configure Power Platform.
That second half is the part people forget. A subscription can exist in your tenant and still not show up in the billing plan dropdown, because the person building the plan has no permissions on it.
Why go through the partner: everything lands on one consolidated Microsoft invoice, in local currency, from a supplier procurement already knows, and the partner supports the subscription when a charge looks wrong. The alternative is somebody spinning up a subscription on a departmental card to unblock a POC, which works fine right up until finance finds it.
Where the partner’s job ends. They provide the subscription. The resource group, the billing plan, and the environment linking all happen in the Power Platform admin center, and that stays with your team or your consultant. Licensing partners generally don’t work in PPAC, so don’t sit waiting for them to finish the job.
Check it worked: sign in to the Azure portal and confirm the subscription is listed and you can create a resource in it.
Step 2: Create a resource group for the billing
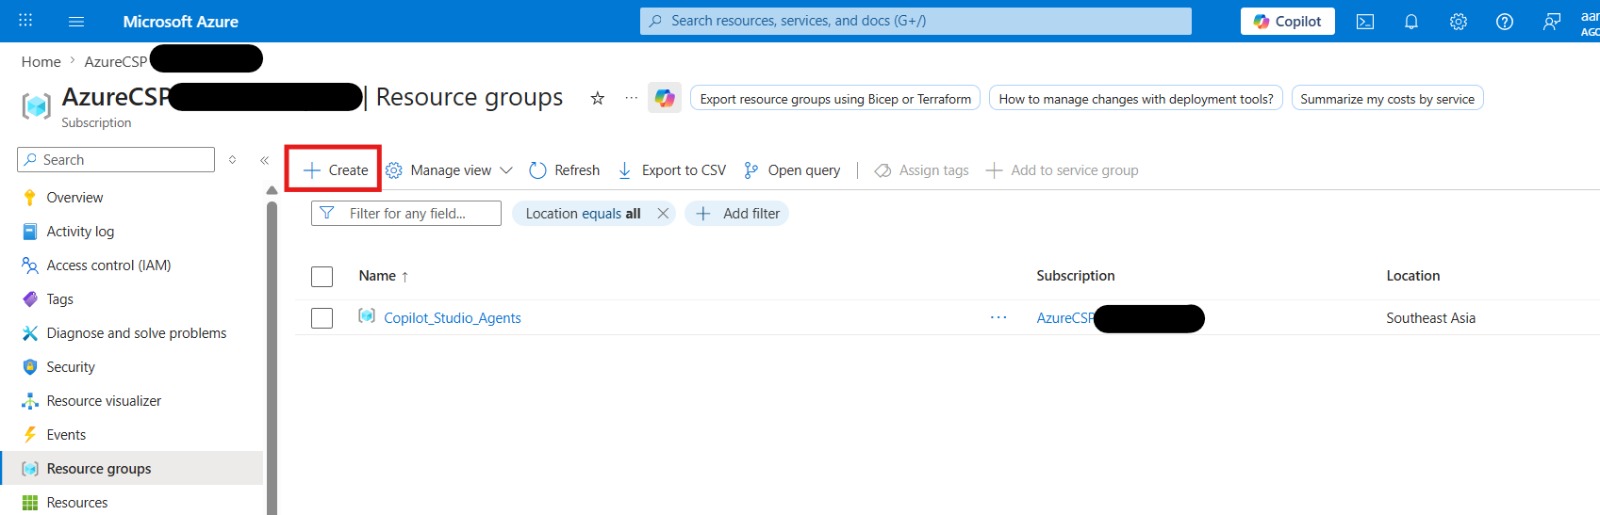
In the Azure portal, create a resource group in that subscription and name it for the team or client it serves.
When you create the billing plan in the next step, Azure quietly provisions a hidden Power Platform account resource inside this group, and every Copilot Studio charge lands against it.
One resource group per department or client keeps chargeback simple later.
Step 3: Create the billing plan and link your environment
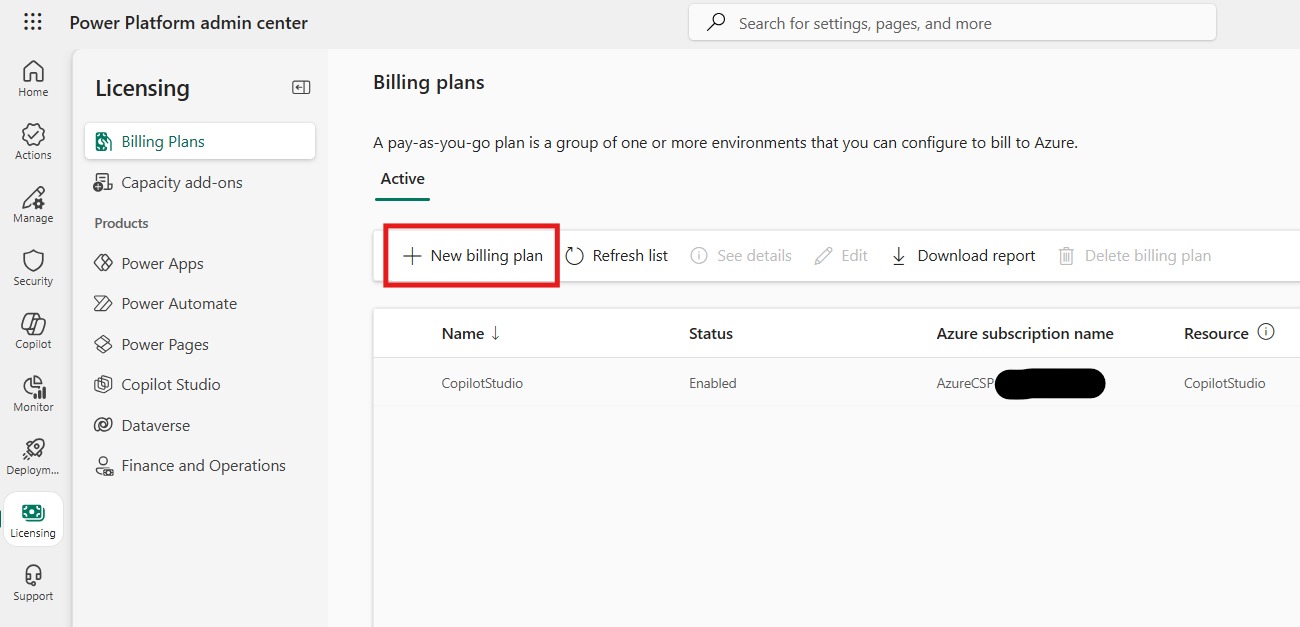
This is the step that turns PAYG on. In the Power Platform admin center:
- Go to Licensing, then Pay-as-you-go plans.
- Select New billing plan, then Azure subscription.
- Name the plan something that identifies the team or client, not “Billing Plan 1”.
- Pick your Azure subscription from the dropdown, then the resource group from step 2.
- In the Power Platform products dropdown, select Copilot Studio.
- Select Next.
- Choose your region, then tick the environment you want to link.
- Select Save.
Don’t skip step 5. If Copilot Studio isn’t ticked in the products dropdown, the meter never applies. You end up with a billing plan that exists, an environment that’s linked, and agents that still complain about capacity. Microsoft’s own documentation barely flags this.
A few rules worth knowing: an environment links to one billing plan at a time, one plan can cover several environments, and you can unlink an environment whenever you want, at which point billing just stops.
Check it worked: the plan appears in the Pay-as-you-go plans list with your environment named against it, and the hidden Power Platform account resource exists in your Azure resource group.
Step 4: Give your makers access to Copilot Studio
Nobody’s buying a license here. When somebody can’t get in, it’s one of two doors, and this is the first.
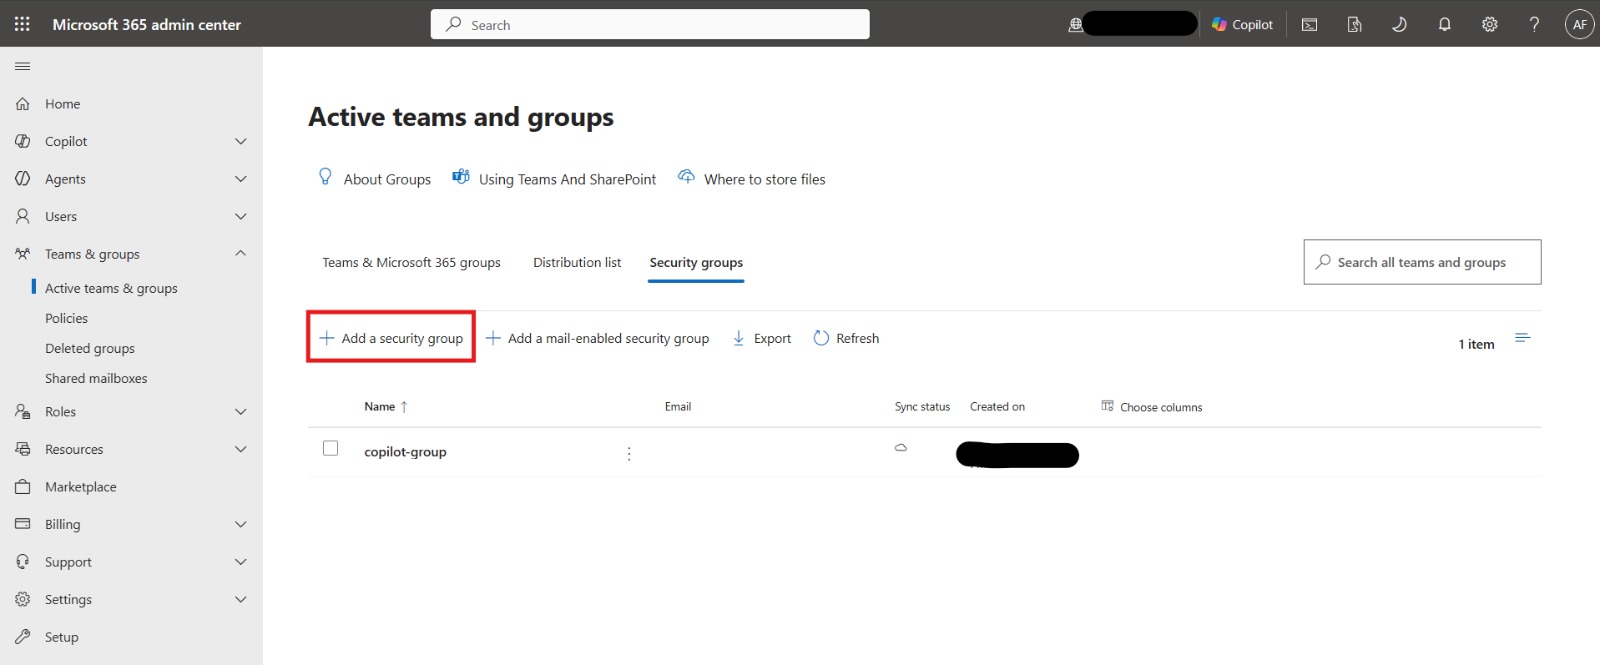
- In Entra, create a security group, something like
Copilot Studio Authors. - Add your makers to it.
- In the Power Platform admin center, open tenant settings.
- Find the Copilot Studio authors setting and point it at that group.
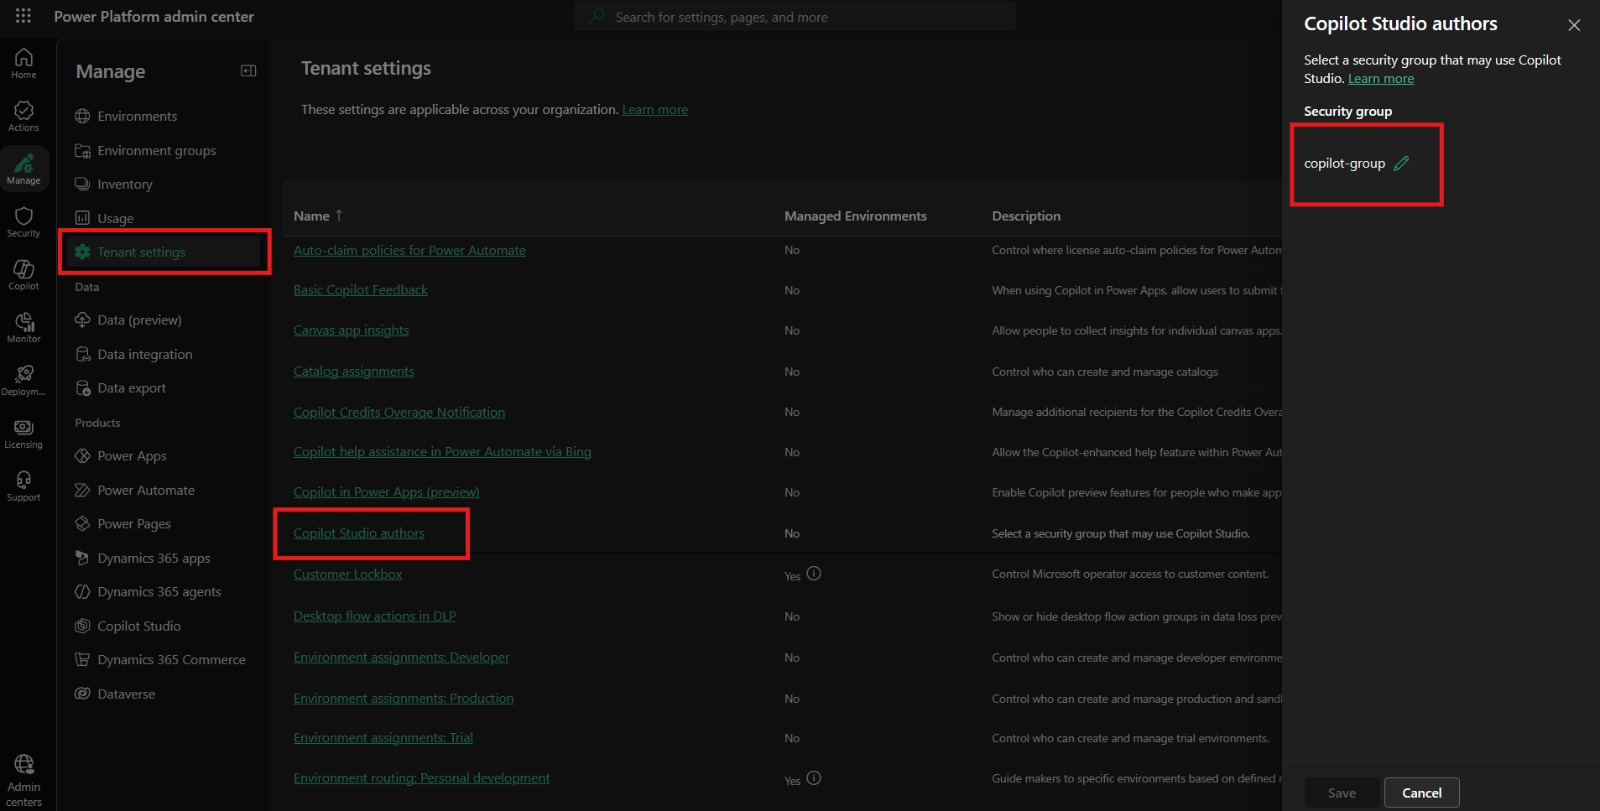
After this you never touch the setting again, you just add people to the group.
(Microsoft also offers a free per-user Copilot Studio license you can assign in the Microsoft 365 admin center, but it requires a prepaid credit pack subscription, so it doesn’t apply to a pure PAYG setup. Use the group.)
Check it worked: a maker in the group can sign in at copilotstudio.microsoft.com without being bounced.
Step 5: Give your makers access to the environment
Door two. Step 4 lets somebody open Copilot Studio, but it doesn’t let them do anything in your environment.
- In the Power Platform admin center, open the environment you linked in step 3.
- Add the user, or better, add an Entra group as a Dataverse group team.
- Assign a security role.
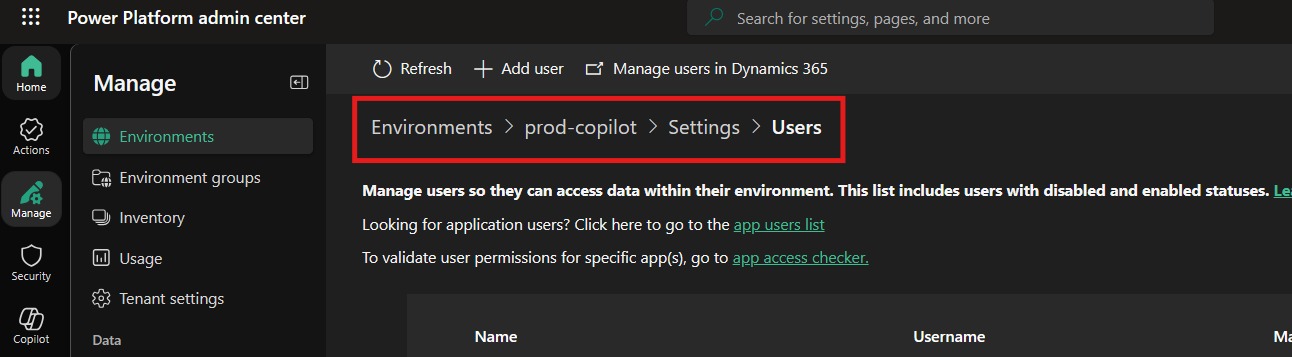
Use a group team rather than assigning roles person by person, for the same reason as step 4: new joiners inherit access on day one.
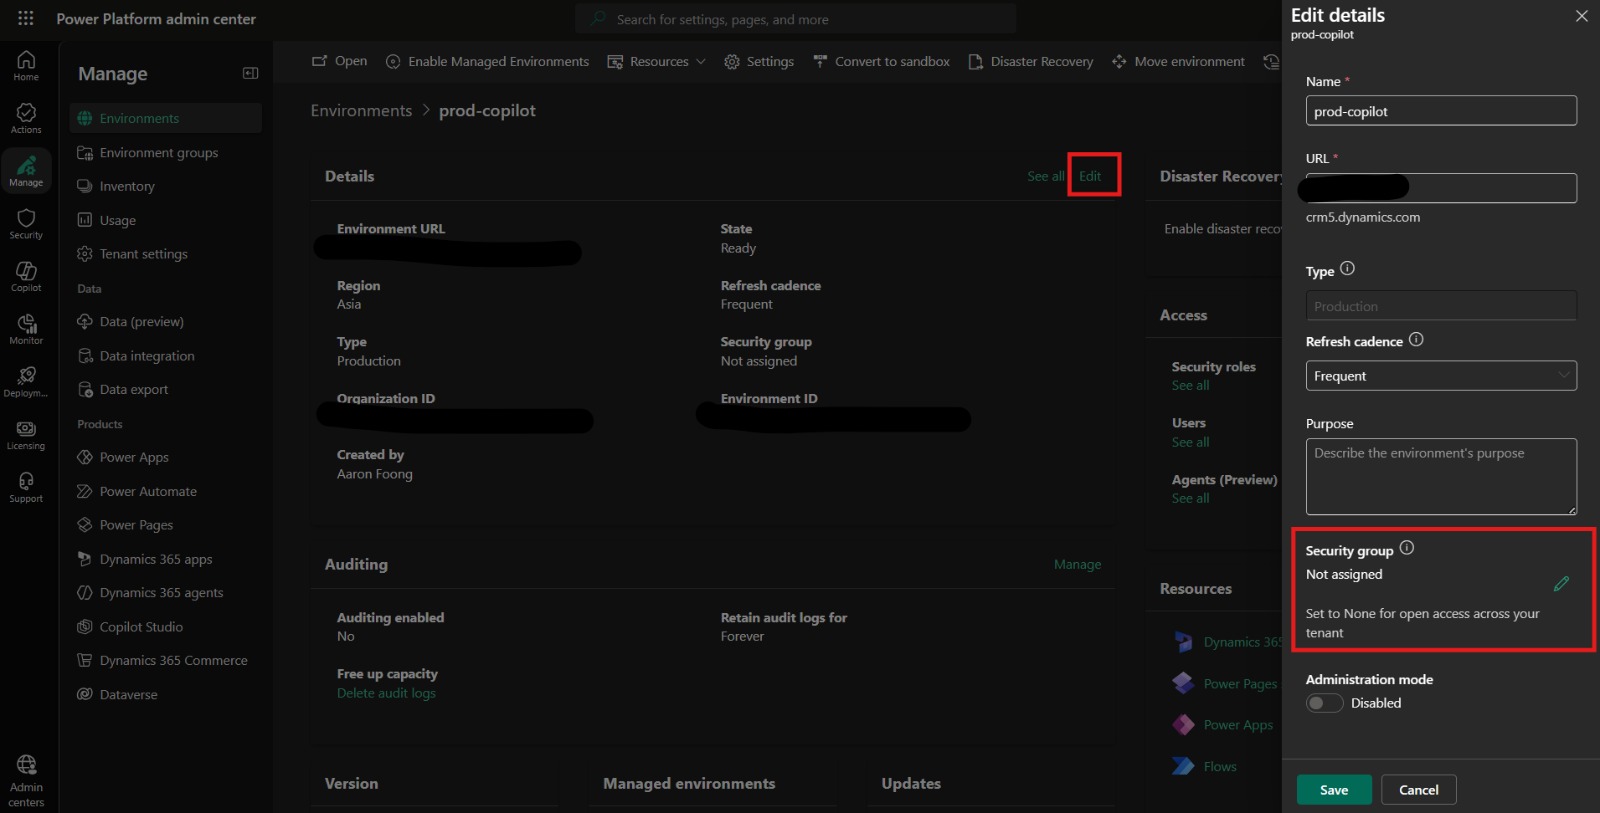
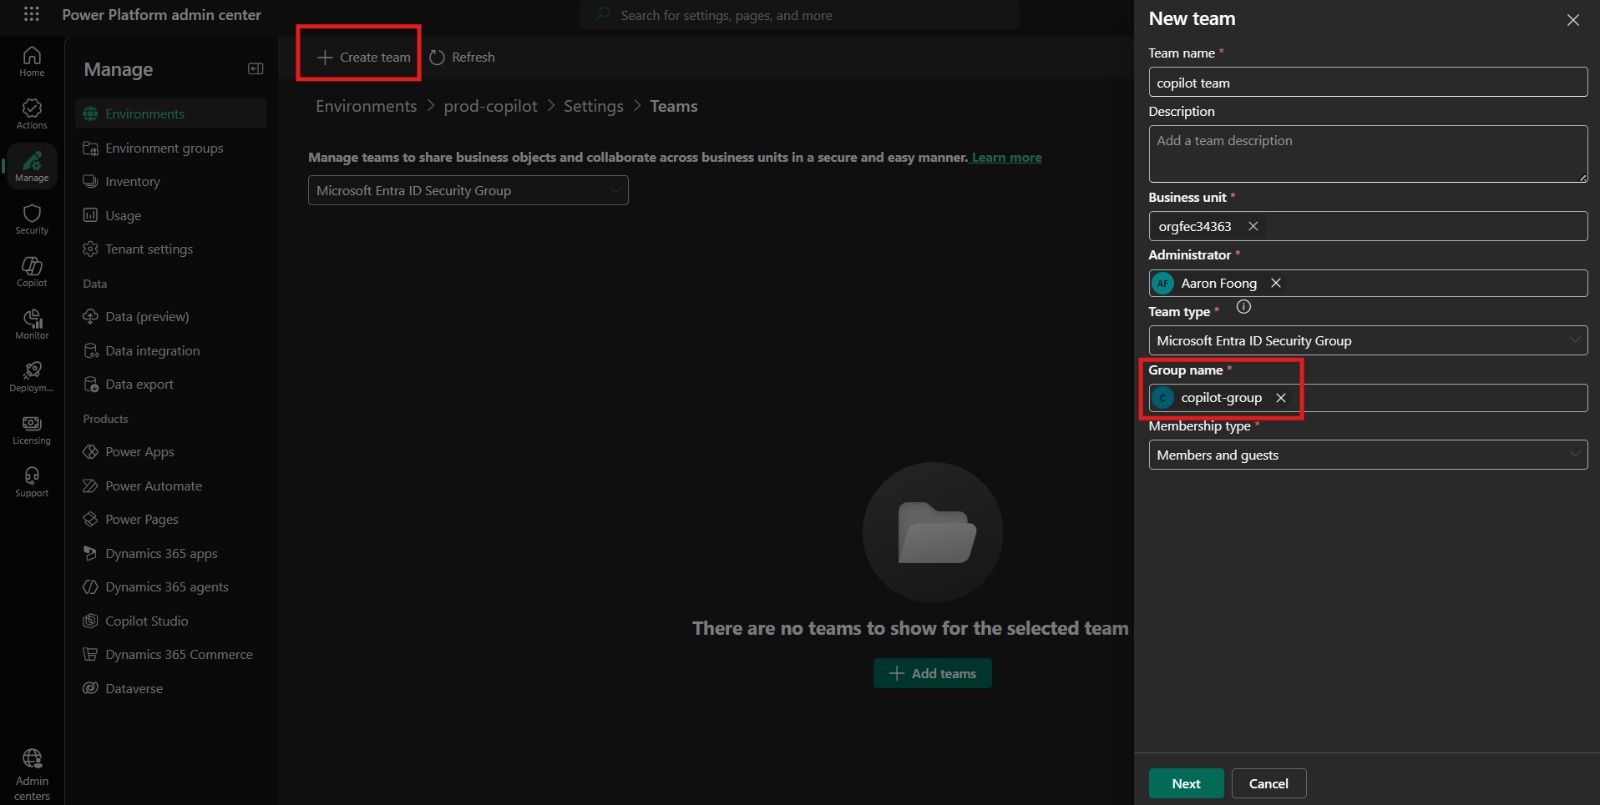
Which role: Environment Maker is the right default for anyone building and publishing their own agents. System Administrator is for the technical lead who needs to see and fix everything. Bot Contributor is for someone who should edit agent components but not create or delete agents.
If two people are co-authoring the same agent, there’s a third layer inside Copilot Studio where you share the individual agent with a colleague. That sits on top of environment access, it doesn’t replace it.
Two things worth telling stakeholders now. The people who eventually chat with your agent need nothing at all: no license, no role, no environment access. And if you’re a consultant working in a client tenant, ask for Environment Maker on day one, in writing, because it’s never granted the same day.
Check it worked: your maker can open the environment in Copilot Studio and create a new agent.
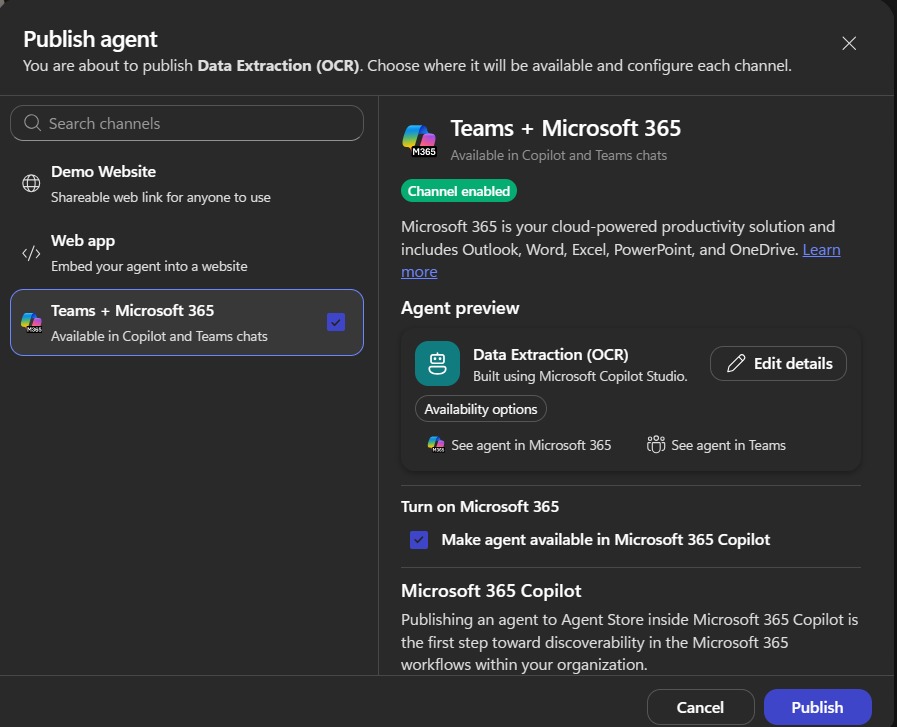
Step 6: Publish the agent
Nothing downstream works until the agent has been published at least once. Open the agent in Copilot Studio, select Publish in the top right, and wait for the confirmation.
That’s it. The agent is now live, but only in the test panel and anywhere you explicitly send it.
Step 7: Choose who can find the agent
Open Availability options. There are three routes.
A direct link. Copy it, send it to a few pilot users, collect feedback. No approvals, no waiting. Start here.
Show to my teammates and shared users. The agent appears in the Built with Power Platform section of the Teams app store, but only for people you’ve shared it with. Good for a wider pilot, and still no admin approval.
Show to everyone in my org. This submits the agent for admin approval. Once approved, it lands in the Built for your org section of the store, where anyone in the company can find and install it.
To go org-wide:
- Remove the agent from the Built with Power Platform section first, or it can end up listed twice.
- Select Show to everyone in my org.
- Review the submission requirements and select Submit for admin approval.
- Confirm.
Your Teams admin approves it under Teams apps > Manage apps in the Teams admin center, or through the agent requests view in the Microsoft 365 admin center. Approval takes a few hours to propagate, so warn your users before they start asking where it is.
Don’t narrow the agent’s access after submitting. If you set it below everyone in the organization, users will install it from the store and then find they can’t chat with it.
Step 8 (optional, but do it): Pin the agent for your users
Ask your Teams admin to add the agent to an app setup policy. That auto-installs it and pins it to the app bar for the users you target.
If people have to go looking for the agent, most of them never will. This one step does more for adoption than anything you built into the agent itself.
Where to check what you’re spending
Two places, and they answer different questions.
- Credit consumption: Power Platform admin center, under Licensing > Copilot Studio. Daily usage by environment, up to three months back.
- Actual money: Azure Cost Management, against the Power Platform account resource in your resource group.
Set a budget alert in Azure while you’re there.
Stuck? Start here
My developer built the agent but can’t publish it
Almost always permissions. Check they hold Environment Maker or higher, and that they’re working in the PAYG-linked environment rather than their personal or default one. The environment picker is in the top right and easy to miss. Self-service trial signups also block publishing by design.
Do we need a separate Copilot Studio license for each developer on top of PAYG?
No. PAYG covers building and publishing for everyone in the linked environment. There’s no per-user Copilot Studio license to buy, and Microsoft 365 Copilot is a different product you don’t need for this. If a developer can’t get in, it’s a permissions problem.
Do end users need a license to chat with the agent?
No. They just use it, and their usage bills to your plan as credits.
We don’t have an Azure subscription. Where do we get one?
Ask whoever supplies your Microsoft 365 licenses. Your licensing partner can provision one into your tenant, usually within a day or two. Make sure they grant your admin rights on the subscription, or it won’t appear when you build the billing plan.
My Azure subscription isn’t in the dropdown
Permissions, on the Azure side. You need rights to create resources and register resource providers on that subscription. Contact the subscription owner or your Azure admin.
Everything is set up but the agent says we’re out of capacity, and nothing is billing
Check that Copilot Studio was ticked in the products dropdown on the billing plan (step 3). Then confirm the environment is actually linked to that plan, and that the agent lives in that environment rather than somewhere else.
My colleague can open Copilot Studio but can’t see our environment or our agent
Environment access. Either they were never added to the environment, they have no security role, or the environment has a security group they’re not in. Go back to step 5.
The admin approved the agent but it isn’t in the Teams store
Give it a few hours, then sign out of Teams and back in, or refresh on web. Teams caches app listings aggressively. If it still doesn’t show up, check nobody narrowed the agent’s access below everyone in the organisation after submitting.
The whole thing on one screen
- Ask your Microsoft partner for an Azure subscription, with rights on it.
- Create a resource group.
- Build a billing plan in PPAC, tick Copilot Studio, link your environment.
- Point the Copilot Studio authors setting at a security group of makers.
- Give those makers Environment Maker on the environment.
- Publish the agent.
- Submit for admin approval.
- Pin it through an app setup policy.
Nobody buys a license. It’s all permissions and plumbing, and once it’s done, it stays done.
Need help with additional configurations? Get in touch.

Enjoyed this? Let’s talk shop.
I’m always up for trading notes, or helping on a project like this one.